Not every failing floor needs to be torn out and started over. But some do. The difference comes down to what failed, why it failed, and whether the substrate underneath is still sound. We assess before we quote — and we’ll tell you straight which situation you’re in.
The right fix depends entirely on what's actually failing. Here's how we read the four most common failure modes and what each one means for your options.
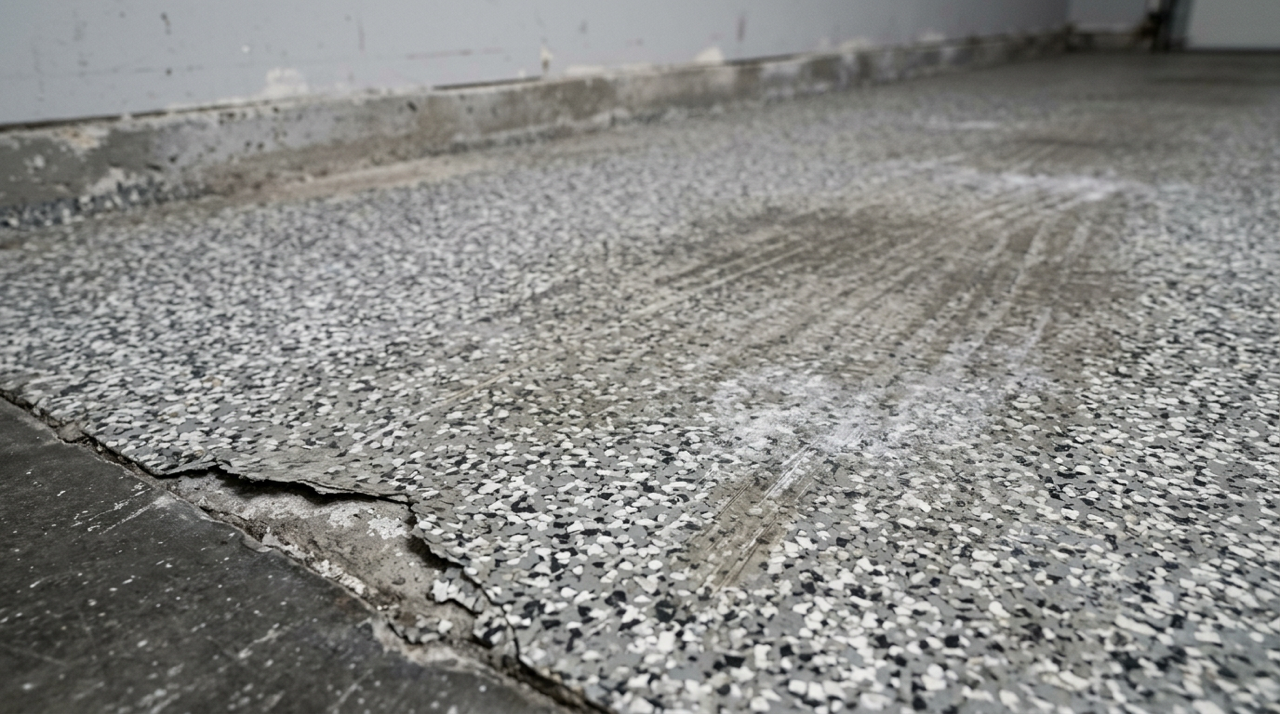
The coating is separating from the concrete in sheets or flakes. This is almost always a surface preparation issue — insufficient concrete surface profile, contamination left on the slab, or coating applied over a previous floor that wasn’t removed. The question is how widespread it is.
Blisters that appear days or weeks after installation are a moisture signature. Vapor from below the slab builds pressure under the coating and lifts it. This cannot be patched over — the moisture source has to be addressed first and an MVB barrier installed before any recoating can hold long-term.
The floor looks dull, scratched, or worn but isn’t actually failing. The base coat and adhesion are intact — the topcoat has just seen enough traffic. This is the best-case scenario: a proper clean, light abrasion, and a fresh topcoat restore the floor without touching the base system.
A section of floor that never hardened properly — stays tacky, picks up dirt, or feels soft underfoot. This is a mixing ratio failure. Coating over soft epoxy won’t fix it; the affected area has to be ground out to bare concrete and redone from the base coat up.
These aren’t sales tiers — they’re genuinely different situations. Here’s what each one involves and when it applies.
Isolated damage, sound substrate confirmed around it, adhesion pull test passed in surrounding areas.
Base coat is intact, adhesion confirmed across the full floor, surface is worn but not failing.
Widespread adhesion failure, active moisture, or a failed base coat that can’t support a new system on top.
We won’t quote repair work without looking at the floor first. The assessment takes an hour and determines everything — which option makes sense and whether the repair will actually hold.
We test the slab with a moisture meter before any primer goes down. If the reading is above 4.5%, any new coating needs an MVB barrier underneath — without it, the same failure will happen again. This test cannot be skipped on a repair job.
We pull-test the coating adjacent to the failed area. If it passes, spot repair is viable. If it fails, the failure is more widespread than it looks and the scope changes accordingly.
We look at the failure pattern, the underside of any lifted coating, and the concrete profile underneath. We won’t recommend a repair without knowing the cause.
Visible damage is usually only part of the picture. We tap the floor to find hollow sections — coating that looks intact but has lost adhesion underneath. Repair scope is based on what’s actually failing, not just what’s visible.
Yes — but only after assessing it properly. We don’t care who installed the original floor. What we care about is what failed, why it failed, and whether the conditions now support a repair that will actually hold. If they do, we’ll fix it. If they don’t, we’ll tell you that and give you an honest scope for what a proper redo looks like. We’ve seen plenty of failed floors that could have been saved with the right repair. We’ve also seen plenty that got patched twice before someone finally took the whole thing back to concrete — which is what should have happened the first time.
We assess honestly and recommend what the floor actually needs — not the option that generates the most revenue for us. Sometimes that’s a recoat. Sometimes it’s a full redo. We’ll tell you which one and why.
Whether it’s a spot repair, a full recoat, or a complete redo, the process starts the same way: assess first, quote second, work third.
01
We visit the space, test moisture, pull-test adhesion, identify the failure cause, and map the full extent of damage. You get a written quote that covers exactly what’s needed — and nothing more.
02
All failed or compromised coating is ground back to bare, sound concrete. Hollow sections found during tapping are included regardless of surface appearance. Feathering new coating over old that’s about to fail will fail again.
03
If moisture is above 4.5%, MVB FC/RC goes down before any primer. On a repair job this step is especially important — moisture is frequently the original cause of failure and cannot be skipped if it’s present.
04
Fusion Primer followed by the appropriate base coat. On a spot repair we build up to match the surrounding floor thickness. On a full recoat, a light scuff precedes primer to ensure mechanical adhesion.
05
Topcoat applied across the repaired or recoated area. Return-to-service depends on the cure formulation — slow, medium, or fast. We walk the floor with you at completion and hand over care instructions before we leave.
Sometimes, but not without testing first. If the existing coating is fully adhered, properly abraded, and moisture levels support it — yes, a recoat can go over it. If there’s any delamination, active moisture, or adhesion failure, coating over the top will reproduce the same failure. We pull-test before recommending anything.
As long as the rest of the floor, assuming the repair is done properly and the original failure cause is resolved. A spot repair where the cause wasn’t identified and fixed will fail again in the same location. That’s why the assessment step matters — we won’t repair a symptom without addressing what caused it.
For solid colour floors, a close match is achievable. For Flake systems the broadcast pattern will be similar but not identical — Flake floors are inherently random and seamless matching isn’t possible. For metallic floors, matching is very difficult. We tell you this honestly before the job starts, not after.
You often can’t tell from the surface. A floor that looks like it needs a simple recoat can have widespread subsurface delamination that won’t show until the new coating starts lifting too. The only reliable way to know is an in-person assessment with adhesion testing and moisture measurement. We do this before quoting anything.
Premature failure almost always comes down to one of three things: insufficient surface prep, moisture that wasn’t tested or addressed, or product applied outside its temperature or humidity window. We’ll identify which one applies and quote accordingly — and we won’t coat over it with fingers crossed.
We stand behind our work on any job where we control the full scope — meaning we did the prep, addressed the moisture, and applied the full system. Warranty on a spot repair into someone else’s existing floor is more nuanced and discussed at the assessment stage once we understand the conditions.
We’ll look at the floor, test what needs testing, and tell you straight what the options are. No obligation, no upsell pressure — just an honest read on your situation.